

Assembling a custom desktop rig gives builders complete control over cooling paths, physical dimensions, and aesthetic presentation. Choosing a proper do it yourself pc case requires balancing internal chassis volume against thermal performance, component clearances, and cable management space. While many enthusiasts focus heavily on raw silicon when planning a build, housing those parts within an unoptimized enclosure can lead to thermal throttling and frustrating installation hurdles. Evaluating whether your selected enclosure supports your target motherboard form factor alongside larger modern graphics hardware ensures that your assembly process proceeds smoothly from start to finish. If you are coordinating your enclosure alongside a new processor, reviewing gaming CPU requirements helps determine whether your cooling clearance matches your chip’s thermal profile.
Modern chassis configurations often feature panoramic tempered glass layouts, integrated reverse-blade intake fans, and dual-chamber compartments that separate the power supply from primary hardware. These physical design elements directly influence how air moves across your graphics card and processor, shaping operating acoustic levels under heavy gaming loads. Builders must also weigh practical considerations such as front-panel high-speed connectivity, radiator bracket locations, and safe transport options for community gaming sessions. By examining detailed manufacturer clearances and physical airflow configurations, you can choose a reliable do it yourself pc case that protects your investment and simplifies future component upgrades.
Pros
- Seven high-quality Infinity Mirror ARGB fans included - no need to buy extras for a fully lit build.
- Excellent component visibility thanks to the 270-degree tempered glass panels.
- Good compatibility with large GPUs, tall CPU coolers, and 360mm radiators for high-end builds.
- Type-C port adds modern connectivity convenience for fast charging and data.
- Fan speeds and lighting can be synced with motherboard software for personalized control.
Cons
- Cable management behind the motherboard tray may require careful routing due to limited space with seven pre-installed fans.
- The case's tempered glass panels are prone to fingerprints and smudges, requiring regular cleaning to maintain clarity.
- Included fan controllers or hubs are not mentioned - users may need to manage fan headers directly on the motherboard.
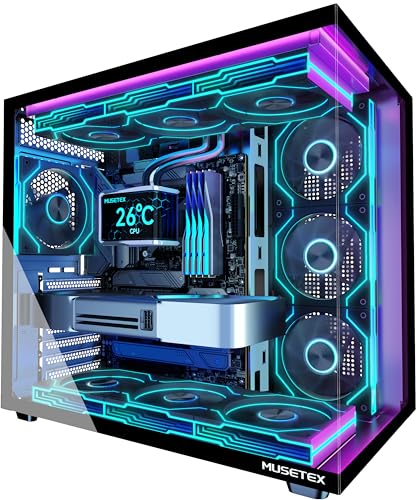
The MUSETEX Y6 is a mid-tower ATX PC case that sets itself apart by including seven pre-installed Infinity Mirror PWM ARGB fans straight from the factory. These are the 9th generation prism fans from MUSETEX, featuring seamless gradient rainbow lighting that transitions smoothly across the blades. For gamers and PC builders who want a vibrant, cohesive look without spending extra time and money on additional fans, this case delivers an impressive visual experience right out of the box.
This case is best suited for PC gamers, RGB setup enthusiasts, competitive gamers, and streamers who value both aesthetics and airflow. The 270-degree full-view tempered glass panels offer an almost unobstructed view of your internal components - perfect for showing off a custom water loop, high-end GPU, or even collectible figures inside the case. The black finish and clean lines fit well in most gaming desk setups, from dorm rooms to dedicated streaming stations.
From a cooling and performance standpoint, the seven 120mm fans include three reverse-flow fans on the side, three reverse-flow on the bottom, and one forward-flow on the rear. This configuration promotes strong intake from the side and bottom while exhausting hot air out the back. The anti-vortex blade design helps maintain steady airflow and reduces turbulence. Based on user feedback and the product description, this layout can effectively cool high-wattage components during long gaming sessions or heavy rendering tasks. The included PWM fans allow speed control via motherboard software, giving you the ability to balance noise and airflow.
Build quality is solid for the price point. The tempered glass panels are sturdy and attach with thumbscrews, though they do attract fingerprints easily. The internal layout is well-organized, with ample clearance for large graphics cards (up to 410mm) and tall CPU coolers (up to 160mm). A top-mounted 360mm radiator is supported, which is great for liquid cooling enthusiasts. The power supply shroud hides cables and drives, contributing to a cleaner build. Cable management is adequate, but with seven pre-installed fans, careful routing behind the motherboard tray is necessary to keep everything tidy.
Setup is straightforward for an intermediate builder. The case comes with a manual and all necessary screws. Motherboard installation follows standard ATX layout, and the I/O panel includes a Type-C port, USB 3.0, USB 2.0, and audio jacks - convenient for modern peripherals. One limitation is that the case does not include a fan hub, so you'll need enough fan headers on your motherboard or purchase a separate hub to control all seven fans independently. Additionally, the glass panels may require occasional cleaning to keep them smudge-free.
Overall, the MUSETEX Y6 offers excellent value for anyone building a gaming PC who wants a head start on RGB lighting and airflow. It's a practical choice for competitive and casual gamers alike, especially those who prioritize visual flair without sacrificing cooling capability. If you're looking to build a showpiece gaming rig on a budget, this case provides a strong foundation. Just be prepared to manage the extra fan cables and keep a microfiber cloth handy for the glass.


Essential Engineering and Selection Principles for a Do It Yourself Pc Case
Planning a custom desktop build requires understanding how chassis dimensions, ventilation pathways, and physical clearances dictate component selection. A high-quality do it yourself pc case provides an organized foundation that accommodates current hardware while allowing effortless component upgrades over time. Builders must look beyond external aesthetics to verify that internal layout structures support their chosen power supply, graphics card, and thermal cooling solutions without physical interference. Careful inspection of technical specifications prevents unexpected assembly setbacks and ensures that your hardware operates reliably during demanding gaming workloads.
Motherboard Form Factors and Component Clearances
Motherboard compatibility forms the initial baseline for any desktop housing evaluation. Enclosures in the mid-tower category, such as the MUSETEX Y6 chassis, typically accommodate standard ATX, Micro-ATX, and compact Mini-ITX circuit boards. Selecting an enclosure that accepts multiple board dimensions gives builders the flexibility to migrate existing hardware or downsize motherboard footprints in future revisions. Verifying standoff placements and backplate openings before mounting hardware ensures that the motherboard sits securely without grounding against the metal chassis frame.
Graphics card dimensions represent another critical clearance measurement that builders must calculate carefully. Modern high-performance video cards frequently feature thick multi-fan heatsinks and extended circuit boards that can easily exceed 300 millimeters in overall length. An enclosure supporting graphics card lengths up to 410 millimeters leaves ample space for massive triple-fan cards while preserving necessary airflow around the front intake zone. When evaluating complete systems alongside custom options, examining dedicated graphics card configurations helps clarify how physical card dimensions scale across different performance tiers.
Processor cooler clearance and power supply depth require equal diligence during planning. Tower-style CPU air coolers require adequate vertical space between the motherboard socket and the side panel, with many mid-tower chassis supporting cooler heights up to 160 millimeters. For power supplies, a compartment that supports unit lengths up to 230 millimeters provides room for standard modular supplies and thick cable bundles. Verifying power supply clearance eliminates cramped conditions where cables must bend sharply against internal drive bays, reducing mechanical strain on electrical connections.
Airflow Dynamics and Dual-Chamber Thermal Architecture
Maintaining balanced internal air movement is essential for keeping high-draw silicon within safe operating temperatures. Modern chassis designs frequently adopt dual-chamber layouts that physically isolate the power supply and storage drives from the primary motherboard compartment. This spatial division prevents warm exhaust from the power supply unit from circulating directly into the graphics card intake area. Separating these thermal zones simplifies cooling management and creates a cleaner interior environment where cool air flows directly over primary processing components.
Fan positioning and blade orientation dictate how effectively fresh air reaches heat-generating components. Traditional chassis setups rely on front-to-back airflow, but panoramic glass designs often relocate intake vents to the side and bottom panels. Specialized reverse-blade fans allow builders to draw cool air into the case through side and bottom mounts while presenting the visually clean side of the fan frame toward the interior. Exhaust duties remain focused on the rear and top panels, expelling rising thermal energy through dedicated forward-blade fans to maintain consistent directional movement.
Dust management represents an ongoing operational factor that builders must plan for during initial assembly. Magnetic dust filters placed across top and bottom intake vents capture ambient debris before it settles into heatsink fins and cooling fan bearings. Removable filters allow quick cleaning without requiring chassis disassembly or tools, preserving unobstructed airflow over extended operating periods. Maintaining positive internal air pressure by providing slightly more filtered intake airflow than exhaust prevents dust from seeping through unfiltered rear panel seams.
Liquid Cooling Radiator Support and Mounting Space
Liquid cooling setups demand precise physical clearances to prevent interference with motherboard components. A chassis engineered to support top-mounted 360-millimeter liquid cooling radiators provides significant surface area for managing high-wattage desktop processors. Placing the radiator assembly at the top panel allows heated coolant to release thermal energy directly outside the enclosure rather than recycling it through internal components. This orientation also prevents air bubbles from collecting inside the pump block, maintaining consistent fluid flow across the CPU contact plate.
Clearance around the upper edge of the motherboard remains vital when installing thick radiator and fan combinations. Builders must verify that the distance between the top chassis mounting rail and the upper motherboard edge accommodates both the radiator core and standard 25-millimeter fans. Insufficient vertical offset can cause radiator fans to collide with tall motherboard VRM heatsinks or high-profile memory heat spreaders. Checking your memory module height before finalizing cooler selections eliminates clearance conflicts during assembly.
Front-Panel Connectivity and Internal Cable Routing
Modern desktop enclosures must provide convenient high-speed connectivity to support external peripherals and rapid data transfers. An optimized front input and output panel typically includes a dedicated USB Type-C port, a USB 3.0 port, legacy USB 2.0 connections, and combined audio jacks. Connecting these external ports requires matching headers on your chosen motherboard, such as an internal Type-E header for front Type-C functionality. Verifying motherboard header compatibility ensures that all front-panel chassis ports operate at their rated transfer speeds without requiring awkward aftermarket adapter cards.
Cable management pathways behind the motherboard tray directly affect both visual tidiness and internal airflow efficiency. Quality enclosures provide generous recessed channels, tie-down anchor points, and rubberized pass-through grommets that conceal excess wiring. Routing thick 24-pin motherboard cables and multi-strand graphics power leads through dedicated rear channels keeps the primary component chamber clear. This clean arrangement prevents loose cables from obstructing airflow channels and reduces the risk of wires contacting spinning fan blades.
Aesthetic Configurations: ARGB Illumination Versus Minimalist Builds
Visual customization represents a major personal factor when selecting an enclosure for a custom build. Many builders appreciate pre-installed lighting setups, such as the MUSETEX Y6 configuration featuring seven speed-adjustable Infinity Mirror PWM ARGB fans that display smooth gradient lighting through dual tempered glass panels. These 270-degree panoramic glass views allow enthusiasts to highlight internal hardware components and collectible figures without visual obstruction from thick metal corner pillars. Addressable RGB headers allow motherboard software suites to coordinate lighting effects across fans, memory sticks, and graphics cards simultaneously.
Other builders prefer a focused, distraction-free aesthetic that prioritizes functional cooling over vibrant illumination. A chassis configured with pre-installed non-LED fans delivers the exact same internal layout, dual-chamber thermal performance, and expansive glass viewing angles while eliminating excess lighting cables. Choosing a non-LED configuration simplifies cable routing behind the motherboard tray by removing multi-port ARGB controller hubs and supplemental wiring harnesses. Both approaches offer identical physical clearance standards, allowing users to match their desktop environment to personal workspace preferences.
Custom Assembly Versus Prebuilt Desktop Trade-Offs
Constructing a PC inside a standalone chassis gives users complete control over component selection, individual part quality, and acoustic profiles. Individual component warranties apply directly to each part, meaning a single hardware malfunction does not require returning the entire computer system for servicing. Building custom hardware also familiarizes the user with interior layouts, making future storage additions, memory upgrades, and graphics replacements straightforward. However, custom assembly requires a willingness to perform hands-on installation, cable management, and hardware troubleshooting if the machine encounters configuration issues on initial startup.
Prebuilt gaming towers provide an alternative path for individuals who prioritize out-of-the-box readiness over personal assembly. Factory-assembled desktops come pre-wired, tested, and configured with an operating system already installed on the primary storage drive. When researching options across retail channels, exploring prebuilt gaming desktop alternatives helps buyers evaluate whether immediate convenience outweighs the modular customization of a DIY enclosure. While prebuilt systems eliminate assembly labor, custom chassis builds generally provide superior airflow flexibility and wider compatibility with standard off-the-shelf replacement components.
Mobile Protection and Safe Transport Solutions
Relocating a completed desktop tower introduces physical risks that builders must actively mitigate, especially when utilizing panoramic tempered glass panels. Glass panels and heavy graphics cards mounted perpendicularly to the motherboard are vulnerable to mechanical shock and vibration during vehicle transport. Purpose-built transport bags, such as the TagerTrek rolling PC carrying case, provide specialized protection with heavy 600D water-resistant polyester fabric and dense internal padding. Sized to hold tower cases up to 21 by 18.5 by 11 inches, these rolling carriers shield fragile exterior glass and structural frame corners during movement between venues.
Organized transport bags also solve the logistical challenge of packing fragile peripherals alongside the main computer tower. Dedicated exterior pockets hold mechanical keyboards measuring up to 19.7 inches, while zippered mesh compartments secure power cords, display cables, gaming mice, and audio gear in separate padded sections. A detachable wheeled cart featuring silent swivel casters and an adjustable aluminum pull handle prevents physical strain when navigating long distances or parking lots. Using cushioned top handles eases transport over curbs and stairways, keeping the entire gaming workstation secure during LAN events or relocations.
Safe Assembly Practices, Cable Connections, and Thermal Verification
Following structured safety protocols during initial hardware assembly prevents accidental electrical damage and component stress. Before handling delicate motherboard circuitry or expansion cards, discharge static electricity by touching a grounded metal object or wearing an antistatic wrist strap. Disconnect all power cables from the wall outlet before seating components, and ensure that power supply switches remain set to the off position during internal work. Never force expansion cards into PCIe slots, and confirm that retention clips click firmly into place before securing mounting bracket screws to the rear chassis frame.
Verifying all power connections before sealing chassis panels eliminates the need for frustrating diagnostic teardowns. Ensure that the 24-pin main motherboard connector, 8-pin CPU power leads, and dedicated PCIe graphics power cables are seated flush without loose locking latches. Fan header cables should connect firmly to designated motherboard PWM headers or bundled fan hubs, allowing system BIOS utilities to control rotational speeds based on real-time temperature telemetry. Magnetic dust filters should be checked for proper alignment to ensure they do not catch on spinning fan blades upon startup.
Conducting initial thermal verification after completing assembly confirms that internal airflow routes function as intended. Enter the motherboard BIOS during the first boot sequence to confirm that all pre-installed fans are recognized and reporting rotational RPM data accurately. Setting appropriate fan curve profiles balances whisper-quiet operation at idle with responsive airflow ramps under sustained gaming or rendering workloads. Monitoring operating temperatures during initial software installations provides immediate confirmation that your cooler contact, thermal compound spread, and chassis ventilation work in harmonious concert.
Selecting an appropriate enclosure ultimately hinges on matching physical component clearances with your personal cooling goals and transport needs. Taking time to verify GPU lengths, radiator offsets, and motherboard header types ensures that your custom build comes together without unexpected compatibility headaches. Whether you prioritize vibrant panoramic ARGB display glass, understated non-LED cooling, or mobile transport protection, grounding your decisions in exact hardware specifications guarantees a durable, high-performing gaming rig.


Write Your Review
No reviews yet. Be the first to share your experience!